
The thread will contain :
1. What is link2sd and how should we benifit from it.
2. Link2sd requirment s.
3. What not to do.
4. What to do in regular basis
1. What is link2sd and how should we benifit from it.
2. Link2sd requirment s.
3. What not to do.
4. What to do in regular basis
. What is link2sd and how should we benifit from it.
Link2sd is an app that using a partition on the sd card to link all your apps to it, in other words it is convincing the phone that it has a larger memory so you can install hundred of apps.
The benifit from link2sd :
*More apps to install
*using apps while you are in storage mode.
---------------------------------------------------------------------------------------
2.Link2sd requirments:
Here will be many sections, if you already done or dont need what is in any section skip it to the next one.
Note: your phone must be rooted.
Note: section A is only for stock roms.
~~~~~~~~~~~~~~~~~~~~~~~~~~~~~~~~~~~~~~~~~~~~~~~~~
A. Here you have to get CF-Root on your device
Or activated superuser “ check it by using for example root explorer, titanuim backup etc...”
install CF-Root by ketut.kumajaya
first install CF-Root-S5830-v3.7-b84.zip (12.55 MB)
By flashing it by recovery
install super user from market Link
then install ext4 as any usual apk
and open it
after that go to CWM and select flash kernel
and flash thisB84.zip.
~~~~~~~~~~~~~~~~~~~~~~~~~~~~~~~~~~~~~~~~~~~~~~~~~
B. If you have any a2sd scrpits or a2sd gui you have to delete it.
Iam not sure about the method, once i get it gonna post it.
~~~~~~~~~~~~~~~~~~~~~~~~~~~~~~~~~~~~~~~~~~~~~~~~~
C. Partition your sd-card:
Simplest way is to use "MiniTool Partition Wizard Home Edition" from http://www.partitionwizard.com/download.html
This tool is compatible with Windows 2000/XP/Vista & Windows 7
requirements: USB SD Card reader.
pull SD card from phone, insert into USB SD Card reader. Windows should report new drive and content of the drive should be visible.
• step 1: delete old partitions on SD card
Note: this partition manager QUEUES the operations. So nothing is deleted and changed UNTIL you click "APPLY" and then confirm by clicking "OK".
WARNING!
Make sure you are deleting partition on SD card! (not your hard drive for example)
This step deletes everything on SD card, so backup files first!
Dont be afraid, just read everything and think twice before selecting correct drive.
Do you see three gray icons on the bottom? Under each of them the capacity of each drive is listed, and SD CARD has slightly different icon.
Hard drives on the screenshot have 465.8GB and 74.5GB, and on the bottom, the SD card, with 3.8GB capacity.

• step 2: create FAT or FAT32 partition “ note that this partition is for storing your media, etc..”
select "Create As": PRIMARY
Select "File System:" FAT when you have 2GB or smaller card.
Select "File System:" FAT32 when you have 4GB or greater card.

• step 3: do the same as step 2 for the seconed partition
you have to select wether it is ext4, ext3 or fat32 " the roms are different but ext4 works for the most of stock , ext3 for cm7's
• step 4: finish
finally, click "apply" button on top left corner.
partitions will be created and card will be formatted.
Reattach your sd card to your phone and turn it on.
~~~~~~~~~~~~~~~~~~~~~~~~~~~~~~~~~~~~~~~~~~~~~~~~~
D. Now use root explorer and copy the attached file to system/app
Give it the permissions rw-r-r.
~~~~~~~~~~~~~~~~~~~~~~~~~~~~~~~~~~~~~~~~~~~~~~~~~
E. open it, then there will be a popup window, select fat32
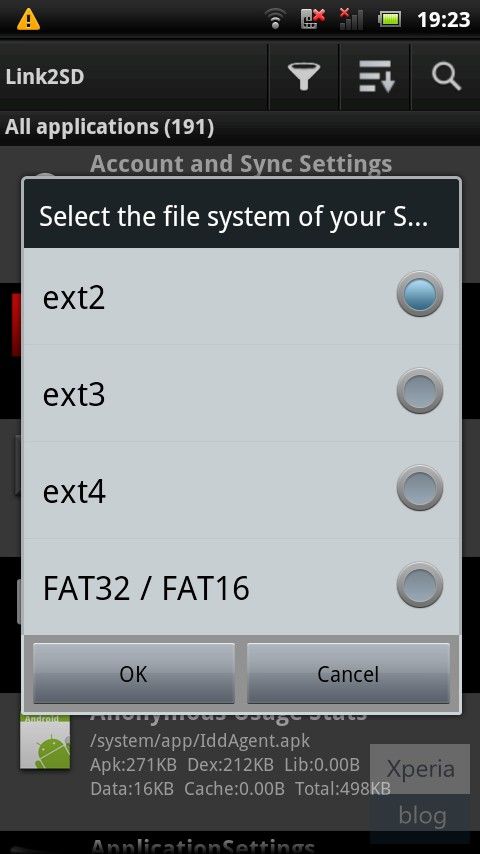
then reboot
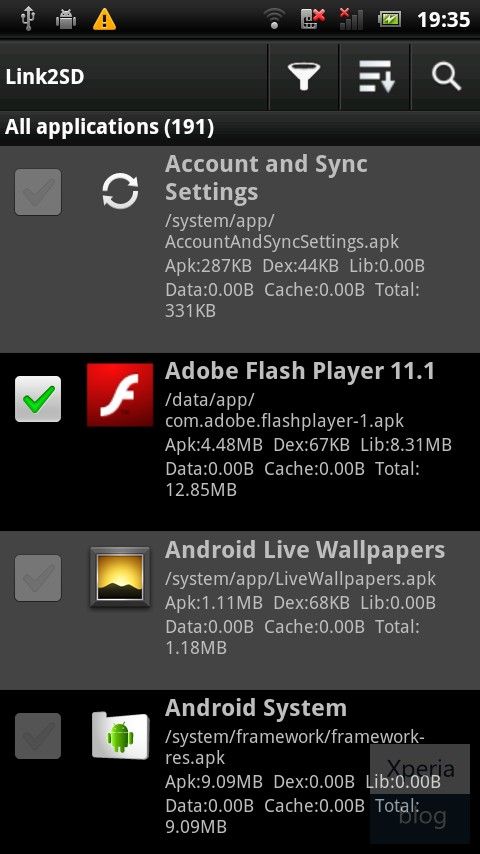
after reboot open link2sd
click filter and select user
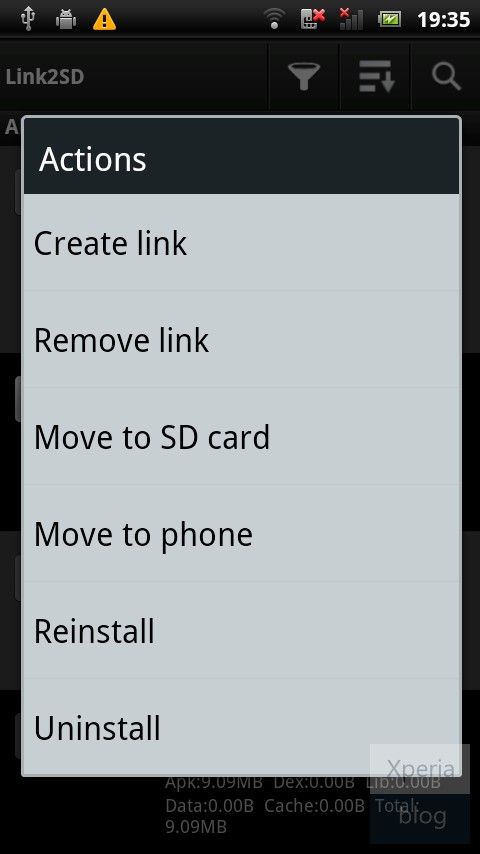
then menu, multi select , select all, or select the apps you wanna to link

menu actions, create link,
tick all the options
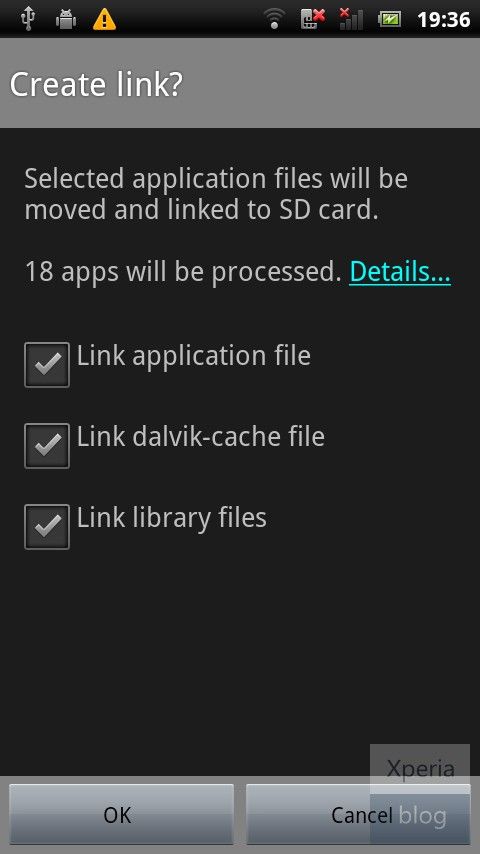
leave it, it's gonna take about halfan hour linking your apps to the new partition
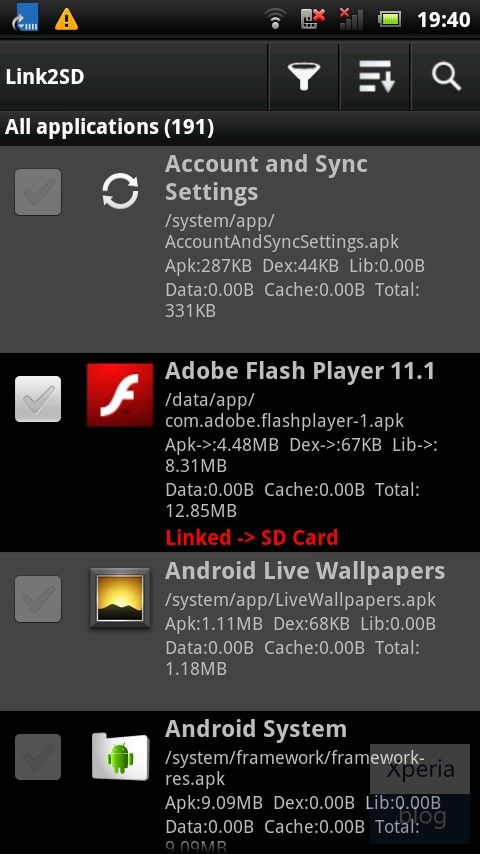
after completion you will see
at the bottom of your app " linked > sd"
then
click menu, settings auto link,

tick them all
-----------------------------------------------------------------------------------------
3.What not to do:
Do not ever wipe dalvick cache by cwm or any recovery
You will get troubles.
if you by mistake think that you are genuis and wiped the dalvik cache from recovery
whenever you boot up, you will get memory full, so open link2sd :
menu>more>link dalvik chache, reboot, then repeat it untill you see all your
apps
then link library files and reboot for two time at least
-----------------------------------------------------------------------------------------
4.Everey couple of days:

1. relink library files
2. relink dalvick cache
3. cleanup 2nd partition
4. cleanup dalvick cache
5. cleanup app chache
6. select all apps and create link.
-----------------------------------------------------------------------------------------
Link2sd is an app that using a partition on the sd card to link all your apps to it, in other words it is convincing the phone that it has a larger memory so you can install hundred of apps.
The benifit from link2sd :
*More apps to install
*using apps while you are in storage mode.
---------------------------------------------------------------------------------------
2.Link2sd requirments:
Here will be many sections, if you already done or dont need what is in any section skip it to the next one.
Note: your phone must be rooted.
Note: section A is only for stock roms.
~~~~~~~~~~~~~~~~~~~~~~~~~~~~~~~~~~~~~~~~~~~~~~~~~
A. Here you have to get CF-Root on your device
Or activated superuser “ check it by using for example root explorer, titanuim backup etc...”
install CF-Root by ketut.kumajaya
first install CF-Root-S5830-v3.7-b84.zip (12.55 MB)
By flashing it by recovery
install super user from market Link
then install ext4 as any usual apk
and open it
after that go to CWM and select flash kernel
and flash thisB84.zip.
~~~~~~~~~~~~~~~~~~~~~~~~~~~~~~~~~~~~~~~~~~~~~~~~~
B. If you have any a2sd scrpits or a2sd gui you have to delete it.
Iam not sure about the method, once i get it gonna post it.
~~~~~~~~~~~~~~~~~~~~~~~~~~~~~~~~~~~~~~~~~~~~~~~~~
C. Partition your sd-card:
Simplest way is to use "MiniTool Partition Wizard Home Edition" from http://www.partitionwizard.com/download.html
This tool is compatible with Windows 2000/XP/Vista & Windows 7
requirements: USB SD Card reader.
pull SD card from phone, insert into USB SD Card reader. Windows should report new drive and content of the drive should be visible.
• step 1: delete old partitions on SD card
Note: this partition manager QUEUES the operations. So nothing is deleted and changed UNTIL you click "APPLY" and then confirm by clicking "OK".
WARNING!
Make sure you are deleting partition on SD card! (not your hard drive for example)
This step deletes everything on SD card, so backup files first!
Dont be afraid, just read everything and think twice before selecting correct drive.
Do you see three gray icons on the bottom? Under each of them the capacity of each drive is listed, and SD CARD has slightly different icon.
Hard drives on the screenshot have 465.8GB and 74.5GB, and on the bottom, the SD card, with 3.8GB capacity.
• step 2: create FAT or FAT32 partition “ note that this partition is for storing your media, etc..”
select "Create As": PRIMARY
Select "File System:" FAT when you have 2GB or smaller card.
Select "File System:" FAT32 when you have 4GB or greater card.
• step 3: do the same as step 2 for the seconed partition
you have to select wether it is ext4, ext3 or fat32 " the roms are different but ext4 works for the most of stock , ext3 for cm7's
• step 4: finish
finally, click "apply" button on top left corner.
partitions will be created and card will be formatted.
Reattach your sd card to your phone and turn it on.
~~~~~~~~~~~~~~~~~~~~~~~~~~~~~~~~~~~~~~~~~~~~~~~~~
D. Now use root explorer and copy the attached file to system/app
Give it the permissions rw-r-r.
~~~~~~~~~~~~~~~~~~~~~~~~~~~~~~~~~~~~~~~~~~~~~~~~~
E. open it, then there will be a popup window, select fat32
then reboot
after reboot open link2sd
click filter and select user
then menu, multi select , select all, or select the apps you wanna to link
menu actions, create link,
tick all the options
leave it, it's gonna take about halfan hour linking your apps to the new partition
after completion you will see
at the bottom of your app " linked > sd"
then
click menu, settings auto link,
tick them all
-----------------------------------------------------------------------------------------
3.What not to do:
Do not ever wipe dalvick cache by cwm or any recovery
You will get troubles.
if you by mistake think that you are genuis and wiped the dalvik cache from recovery
whenever you boot up, you will get memory full, so open link2sd :
menu>more>link dalvik chache, reboot, then repeat it untill you see all your
apps
then link library files and reboot for two time at least
-----------------------------------------------------------------------------------------
4.Everey couple of days:
1. relink library files
2. relink dalvick cache
3. cleanup 2nd partition
4. cleanup dalvick cache
5. cleanup app chache
6. select all apps and create link.
-----------------------------------------------------------------------------------------
Original Post:HERE


0 komentar:
Posting Komentar